Salt Painting
Salt painting is a creative way to teach children about absorption. In this lesson, children will learn how the watercolor paint reacts with the salt as the paint “travels” along the glue/salt line.
Content Area:
Curiosity and Wonder
Learning Goals:
This lesson will help toddlers and preschoolers meet the following educational standards:
- Demonstrate curiosity about the world and begin to use the practices of science and engineering to answer questions and solve problems
- Explore concepts and information about the physical, earth and life sciences
Learning Targets:
After this lesson, toddlers and preschoolers should be more proficient at:
- Drawing meaning from experiences and information by describing, talking and thinking about what happened during an investigation
- Making careful observations
- Engaging in simple investigations
- Generating explanations and communicating ideas and conclusions about their investigations
- Understanding that they can use scientific processes to learn more about the world
- Learning through inquiry and making their own discoveries
Salt Painting
Lesson plan for toddlers/preschoolers
Step 1: Gather materials.
- Card stock, poster board, cardboard or paper plates
- Squeeze glue bottle
- Table salt
- Trays or deep baking pans to catch the salt
- Spoons or cups to hold salt for each student
- Liquid watercolors
- Paint brushes or pipettes
Note: Small parts pose a choking hazard and are not appropriate for children age five or under. Be sure to choose lesson materials that meet safety requirements.
Step 2: Introduce activity.
- Explain that we will be creating a raised salt painting.
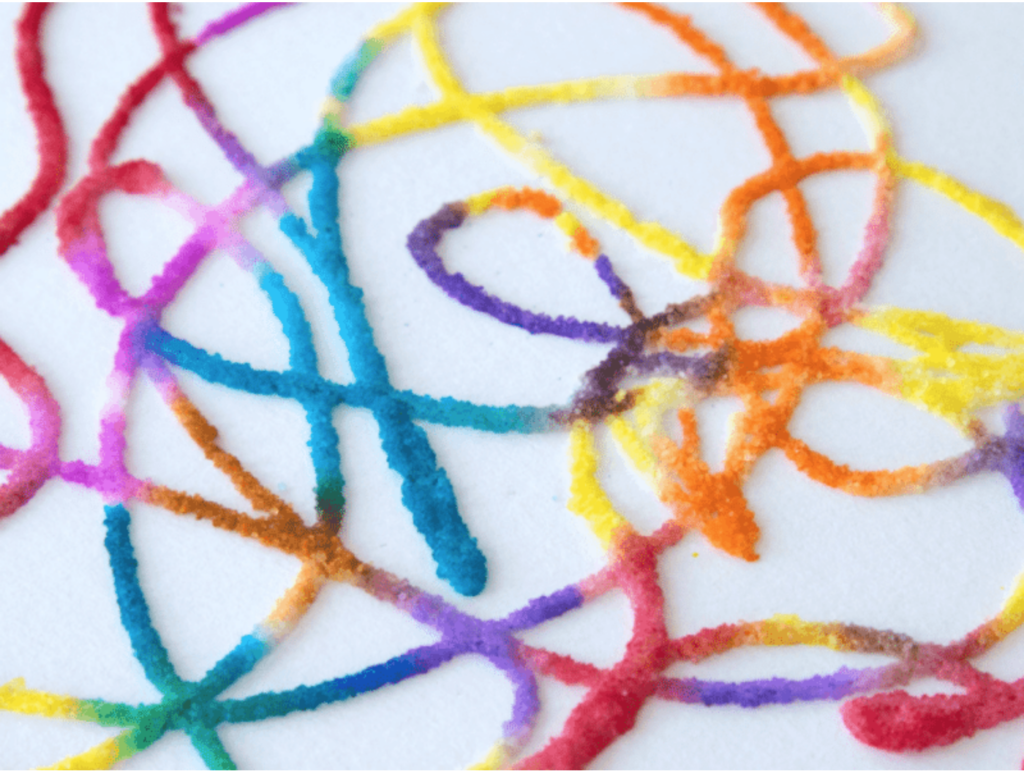
- Show the children how to draw a shape or a letter with glue on cardstock and place the cardstock in a tray with edges, a baking dish or a box. Then show them how to sprinkle salt over the glue lines and gently shake the paper to remove any loose salt after the glue is well coated.
- Now show the children how to use the pipette to drip the liquid watercolors on top of the salt.
- Tell the children that the scientific goal is not to drench the pattern, but rather to observe the salt soaking up one droplet of paint at a time.
- Emphasize that the salt absorbs the paint. When the salt and paint mix with the glue, an interesting texture appears. Give the mixture time to dry thoroughly. Some of the salt might flake off if there is not enough glue.
- Invite the children to make predictions about what will happen when they drop the watercolor onto the salt. As you touch the tip of the watercolor brush to the glue/salt lines, the salt will quickly absorb the liquid watercolors.
Step 3: Engage children in lesson activities.
- It’s a good idea to use tablecloths or newspapers for this activity to make cleanup easier, as the salt tends to get a bit messy. If you have access to trays, cookie sheets or cardboard boxes to keep the salt contained, you will thank yourself later in the day.
- Instruct the children to use the squeeze glue bottle to paint a design or a picture on their card stock.
- Tell the children to sprinkle the salt until the glue is thoroughly covered and then tip the cardstock so that the excess salt falls away.
- Instruct the children to dip their paintbrushes or pipettes into the liquid watercolor paint, then gently touch the tip of the pipette or paintbrush to the salt-covered glue lines. Encourage them to observe how the paint “magically” travels in both directions, how the paint is absorbed and how it travels slowly throughout the pattern. Then prompt them to add drops of different colors and observe what happens.
- Let the salt paintings dry thoroughly. This may take a day or two. Make sure to shake the dried paintings over the garbage can to remove any excess salt before sending the paintings home with the children.
- Ask follow-up questions: “Did the salt absorb the paint? Did some colors absorb more paint or surprise you by changing in some way?”
- Say: “Salt has the ability to absorb moisture from its environment. This property of absorption is called hygroscopic. Hygroscopic means that salt absorbs both liquid water (the watercolor paint mixture) and water vapor in the air.”
Step 4: Vocabulary.
- Absorption: The act of soaking up or absorbing (materials that absorb water include a sponge, a napkin, a paper towel or a cotton ball)
- Hygroscopic: Absorbs both liquid water and water vapor (moisture) from the air
Step 5: Adapt lesson for toddlers or preschoolers.
Adapt Lesson for Toddlers
Toddlers may:
- Have more success with pre-glued salt and a paintbrush
Child care providers may:
- Wish to do this as a Friday to Monday project: Apply the glue and salt on Friday, let it dry over the weekend and paint on Monday.
Adapt Lesson for Preschoolers
Preschoolers may:
- Use this as an opportunity to watch the colors mix and observe the results
Child care providers may:
- Encourage the children to experiment by using more or less paint on the brush tip
Suggested Books
- Does It Absorb or Repel Liquid? by Cynthia O’Brien
- Maybe Something Beautiful: How Art Transformed a Neighborhood by F. Isabel Campoy
- The Rain Came Down by David Shannon
Music and Movement
- “Color Game“ by Jim Gill
- “I Like The Color Red” by Mr. Al
- “Shake Sugaree” by Taj Mahal
Outdoor Connections
- This is a great outdoor activity!
Web Resources
Visit the Artful Parent to learn more about salt painting!
Comment on this lesson